Are you as nuts about amigurumi as I am? Then this blog post should be right up your alley!
I’ve made several amigurumi in my time as a crocheter, and I’ve learned some tricks along the way that ensure even and beautiful results every time. And I’d like to share them with you right here 🥰
No. 1: Use the right yarn
I’m a big supporter of the theory that there’s no right or wrong way to crochet. The entire point of crocheting is to have fun and be creative, right? But when you’re crocheting amigurumi, your choice of yarn can have a huge impact on your project.
Choose yarn with an even weight
Some yarns are spun in such a way that the weight of the yarn is uneven, just like our Winter Glow. This type of yarn is amazing for clothes and blankets because the different weights catch the eye and make the project come alive. But when you’re working on an amigurumi, it’s important that the stitches are as even as possible to ensure a beautiful result that doesn’t look crooked.
I usually use Rainbow Cotton 8/4 or similar cotton yarns for amigurumi because the even, form stable cotton ensures nice and even stitches and a good structure in your final project.
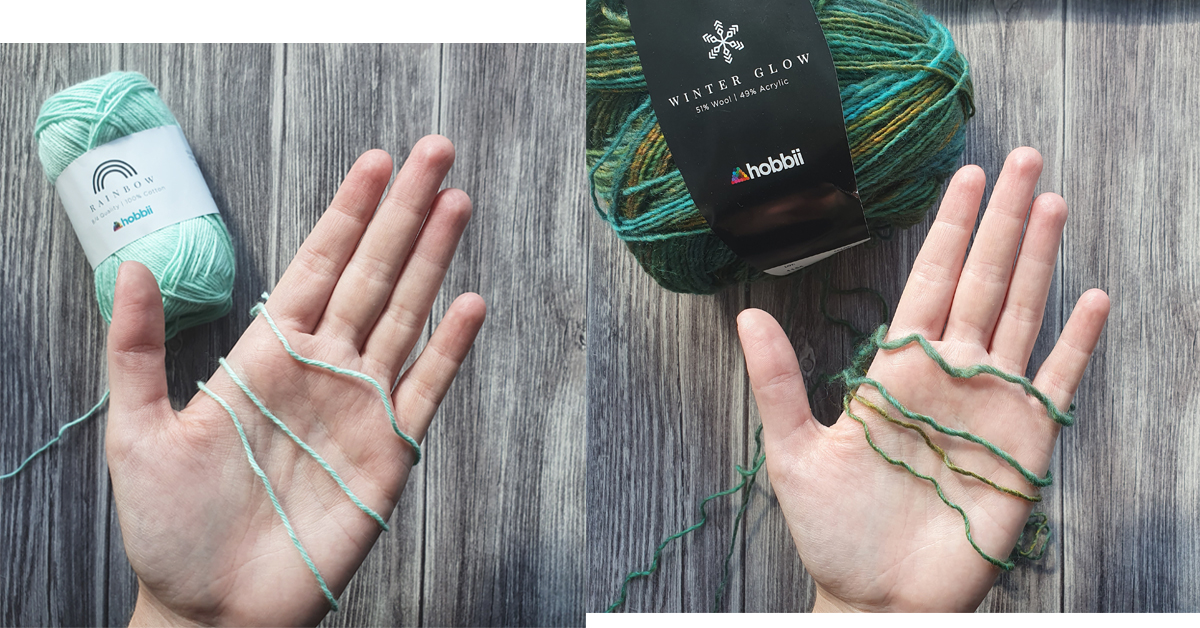
In the photos above, you can see how Rainbow Cotton 8/4 has an even weight, while the weight of Winter Glow varies ☝
When you’re looking through amigurumi patterns, you’ll notice that most people tend to use pure cotton yarns.
Some patterns, however, use other types of yarn like Baby Snuggle or Teddy. And that’s totally fine! However, when you’re working with these types of yarn, you need to pay extra attention to your crochet tension to make sure that you get an even result that doesn’t get droopy. Find out how below.
No. 2: Make sure that your crochet tension is tight
When you’re making amigurumi, I usually recommend a slightly tighter crochet tension than what you’d normally have when you’re making items like clothes. If you don’t, you run the risk of getting a droopy end result that’ll lose its shape and where the filling is visible through the stitches.
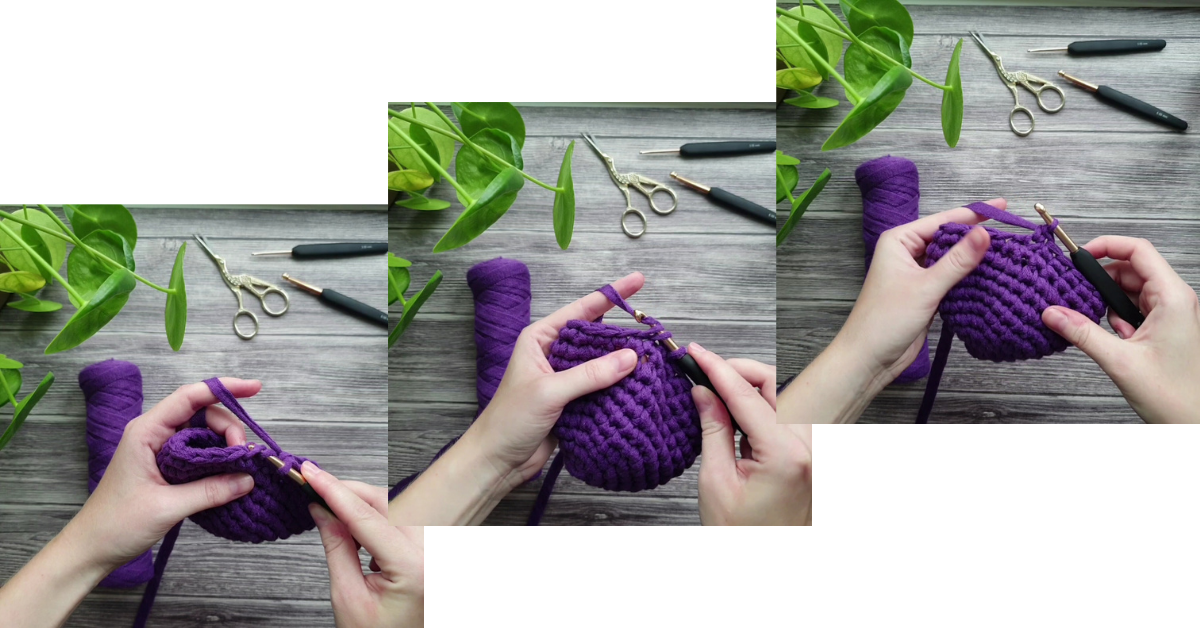
One way to test this is by crocheting a swatch of single crochets with the chosen yarn and crochet hook. When your swatch is approx. 10x10 cm (4”x4”), you can put a ball of filling in the middle and scrunch the swatch around the filling like you would if you were closing it off in the back.
In this image, I’ve made my swatch and put some filling in the middle 👇
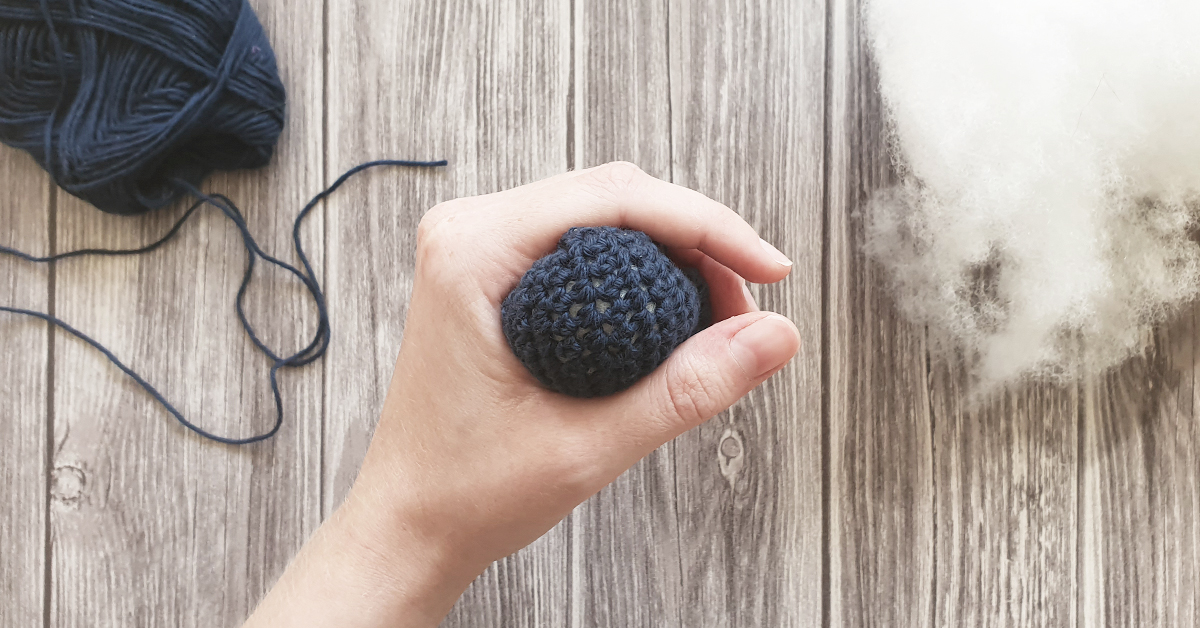
If your filling is visible, like in this image, you need to achieve a tighter crochet tension. You can do so by:
Using a smaller crochet hook
You can start by using the recommended size as a guideline.
For our Rainbow Cotton 8/4, we usually recommend a 2,5-3,5 mm crochet hook. These sizes work well for blankets, clothes, and other projects where the stitches shouldn’t be too tight.
So, when you’re making an amigurumi, you could start with a 2,5 mm hook and then test your swatches from there. If it’s too loose, then try going down half a size and continue like this until you achieve the correct tension.
Grip your yarn properly
Are your stitches uneven, or is the filling visible through your stitches? Then you should try tightening the yarn when you’re crocheting. You can tighten the yarn by adjusting your grip on the yarn.
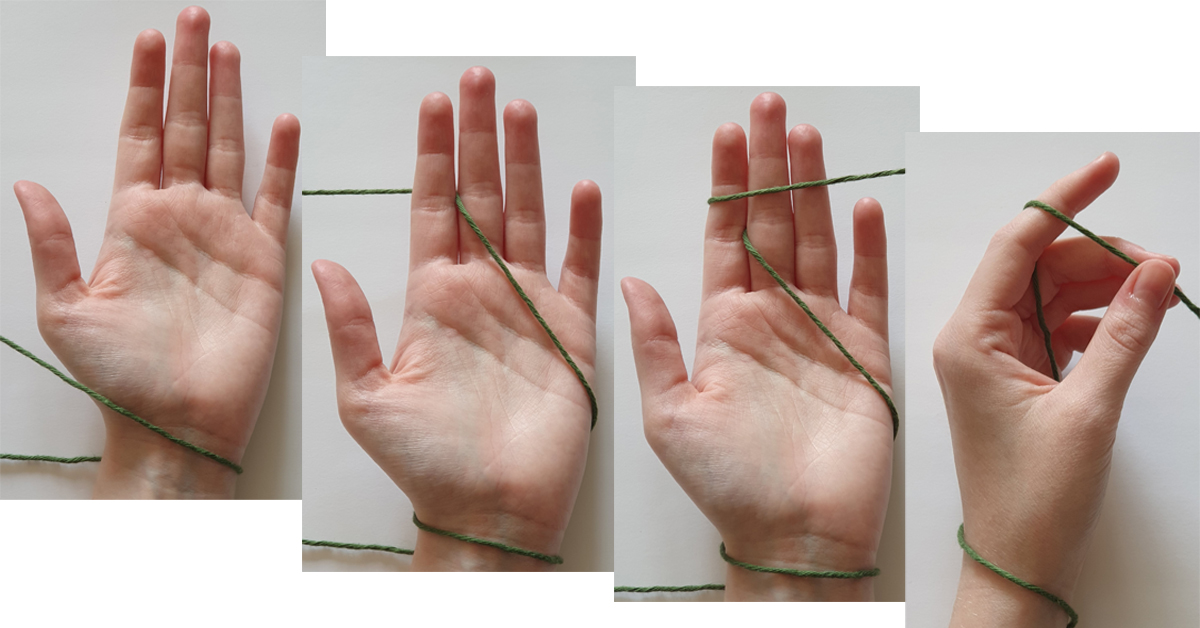
When I’m making amigurumi, I usually wrap the yarn around my wrist followed by running it up my palm and over my index finger. That way, I’m using my index as well as my middle finger to control the tension of the yarn, and the one wrap around the wrist tightens the yarn for me even more.
Read more about different gripping techniques here.
Only stuff sparingly while you work
When you’re following an amigurumi pattern, the designer will typically note when it’s time to stuff it. It’s very important that you don’t stuff as much filling in your project as you can right away. If you do so, it’ll become much harder to make tight stitches.
To avoid this, start by only stuffing your amigurumi enough to give your project a slight structure. Then you can add a little more filling each time you’ve made a new row. You should only start stuffing the amigurumi as much as possible when you’re on the second to last row, or when you’re just about to bind it off.
If you’re finding it hard to get your finger through the opening, you can use a chopstick, a straw, the handle of your crochet hook, or anything similar to stuff it. It takes patience, but it’ll make for a much nicer end result. I think it’s absolutely worth it!
No. 3: Use invisible decreases
Increases and decreases are a big part of making amigurumi. They create the shapes of the amigurumi, and that’s why it’s important that they look as nice as possible and don’t distract too much from the end result.
Decreases can become especially noticeable since they look different than a normal single crochet.
You can avoid this by making invisible decreases. This is how:
Work your hook through the front loop of the next stitch
Work your hook through the front loop of the next stitch, you should now have two stitches on your hook
Yarn over and pull the yarn though the first two loops
Yarn over an pull the yarn through the rest of the loops
No. 4: Make beautiful color changes
Some amigurumi patterns need you to change colors. But most amigurumi patterns also have you working in a spiral, which means that there’s no clear switch between rows since you’re working in one continuous row. So, when you’re changing colors, the color shift can become quite noticeable.
You can use the following 4 easy steps to achieve a better transition from one color to another:
Start a new single crochet with the first color by pulling the yarn through the stitch from the last row
Finish the single crochet with the new color by pulling it through the two loops on your hook
Make a slip stitch with the new color in the next stitch
Continue with single crochets in the new color

5. Avoid safety eyes – make your own eyes for your amigurumi
Safety eyes are often used for amigurumi. They’re easy to click into place as you work, and, bam! Two round balls as eyes.
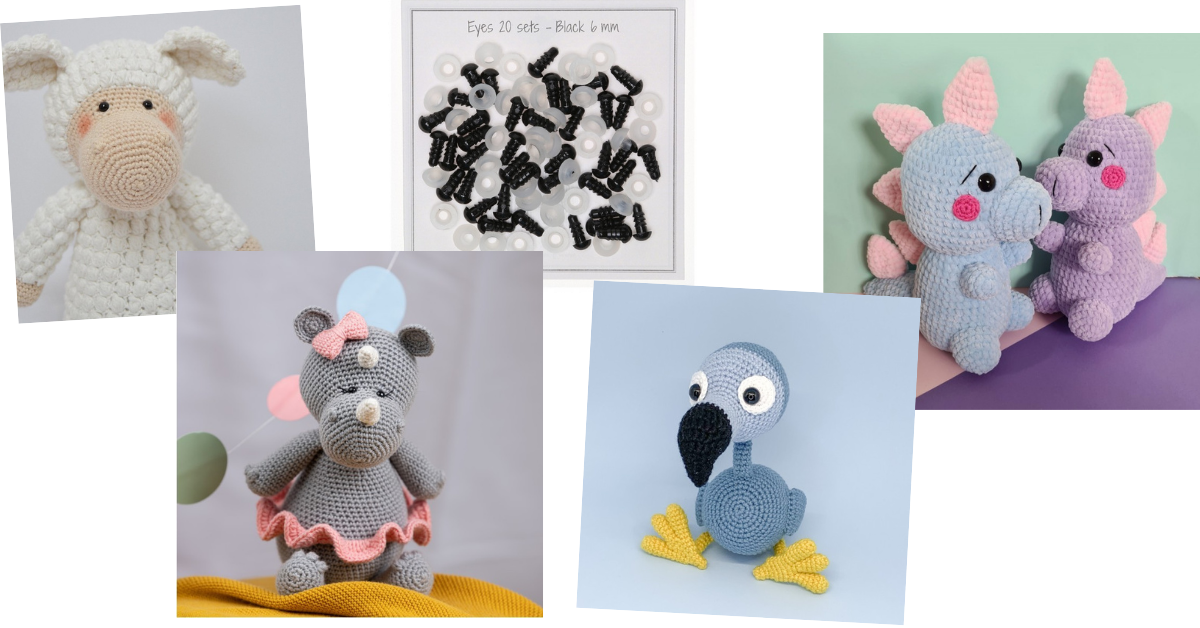
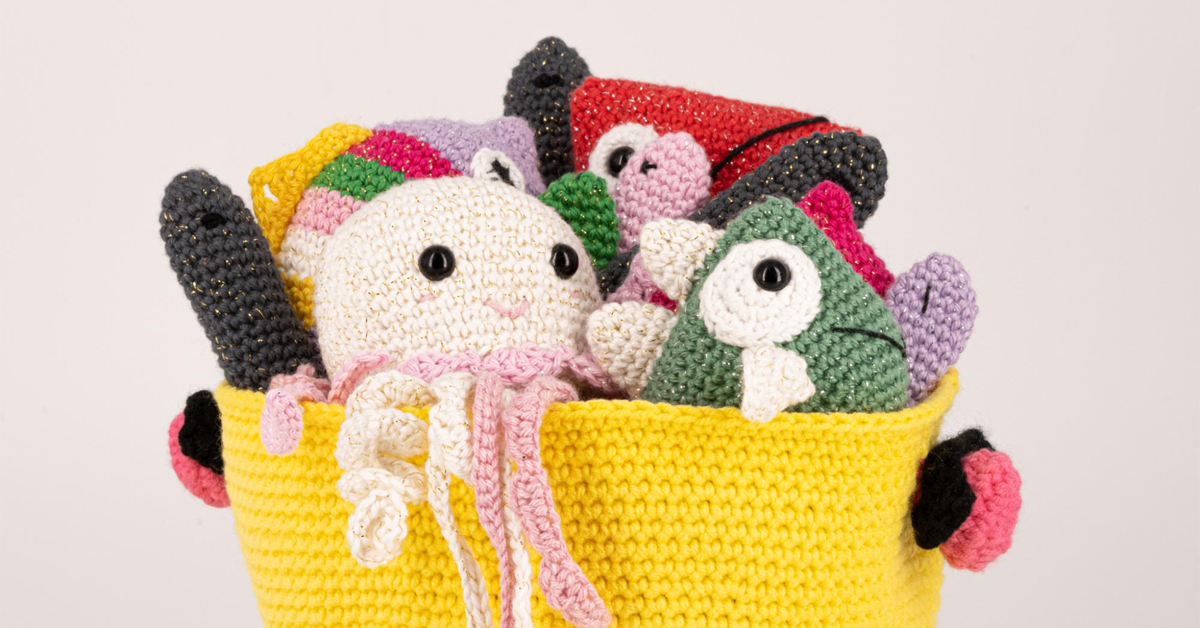
Love these amigurumi? ☝ Find the free patterns for Frida the Sheep, Hollie the Rhino, Duncan the Dodo, and Dylan the Dino on our website.
I, on the other hand, have become quite fond of embroidering or crocheting my own eyes eyes for my amigurumi for several reasons. For one, I can give them creative expressions, and another very important reason: some amigurumi are given as gifts for children – and not all parents are comfortable with safety eyes.
My advice is to get yourself an arsenal of patterns that include instructions for crocheted and embroidered eyes. Then you can always pull them out when you’re making a new amigurumi.
These are some of the ones I’ve saved from our website (completely free, of course) that I can use as a reference when I’m about to make eyes for my amigurumi:
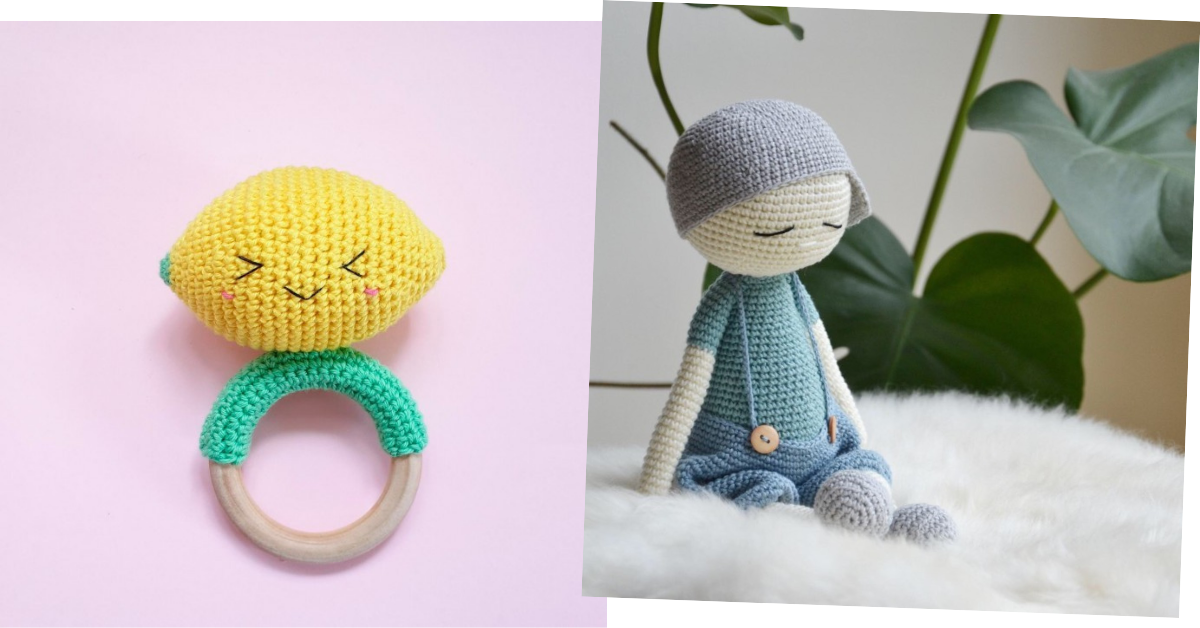
Try the simple combination of lines, like the ones you see here on Kawaii Lemon Rattle and the doll Elliot.
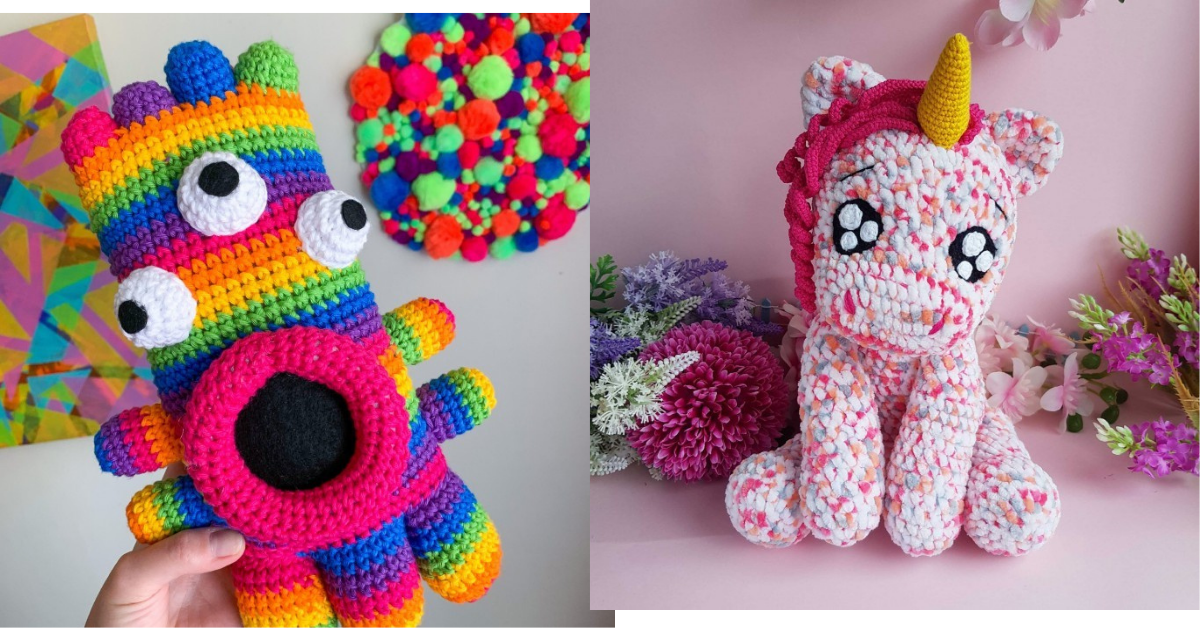
You could also make a couple of large and expressive eyes by crocheting a couple of circles like we’ve done here in the Confetti Unicorn. Or use felt to help you like we’ve done in this vibrant Be Weird Monster.
Alternatively, you could have a look on YouTube. You can find lots of instructions on how to make different kinds of embroidered eyes for your amigurumi projects there. Try searching for “embroidery eyes amigurumi”.
NB: if you speak another language than English, try typing it in your own language. But be aware that you might not get as many results.
I hope these tips will help you the next time you’re making amigurumi.
Have any amigurumi projects in mind? Please tell us about them below 👇


