This knitter’s guide is a step-by-step instruction for anyone who wants to get started on their first project. Learn everything you need to know about materials and the most basic techniques and find inspiration for your first project.

Would you love to learn how to knit but almost choke on your coffee when you see the many knitting abbreviations in a pattern?
Don’t worry. Anyone can learn how to knit (yeah, that includes you!). You’ll learn the basic techniques in the blink of an eye, and before you know it, you’ll hold your first finished project in your hands. Remember, your skilled grandmother also had to learn what a stitch is once.
Want to learn how to knit? Then you’re in the right place. I’m here to help you get a great start on your very first project - step by step.
So, grab your yarn and knitting needles - your knitting journey starts now!
In this blog post, I’ll help you:
choose the materials for your first knitting project
get you off to a good start with the most basic techniques
find inspiration for beginner-friendly knitting patterns
Are you ready? Let’s begin with an introduction to the materials you’re going to need for your first project.
Materials: Get off to a good start
Yarn and knitting needles. That’s basically what you need when you’re knitting. With that said, there are some other very valuable tools that you may want to acquire too.
What you’ll need:
- Knitting needles
- Yarn
- A small pair of scissors
- A measuring tape
- A good needle
- Stitch markers
Find your accessories here.
Psst! Just look at these fun unicorn scissors and these festive stitch markers that are sure to bring a smile to your face.
Choose the right yarn
You have lots of different yarns to choose from and in many different materials, weights, and lengths. To a beginner, it may seem overwhelming (believe me, we’ve all been there), but it’s really not as complicated as it may seem at first glance.
Find the information you need about the yarn on the label. When you buy a skein of yarn, there’s a wide strip of paper hugging it. That’s the label, and it provides you with all the information you need about the yarn to help you ensure that your project will turn out as intended.
Good to know about your yarn
- Content tells you what the yarn is made of. There are lots of materials to choose from, and many yarns consist of a blend of multiple types of fibers. Some of the popular yarn types are cotton, wool, alpaca, mohair, and acrylic.
- Color and LOT number specify the color of the yarn and the batch it’s from. It’s important to check this information when you’re buying yarn for a project to make sure that the colors of your yarn won’t vary too much, which will affect your knitting in the end.
- Weight specifies how much the yarn weighs in grams, while length describes how many meters of yarn you’ll get. This information is important when you need to calculate how many skeins you’ll need for your project.
- Recommended needles refer to the size or thickness your needles need to be in order to get the best result with any given yarn.
- Gauge is an important indicator when it comes to hitting the right measurements when you're knitting. Gauge is measured in a 10 x 10 cm square (4”x4”) on your knitting and is written as the number of stitches you need to have diagonally and the number of rows you need horizontally. For example, if it says 10 x 10 = 22 stitches x 27 rows, it means that you need to have 22 stitches per 10 cm in width and 27 rows per 10 cm in height.
- Washing tells you how to wash the yarn.
In addition, our webshop and some of the labels will show you to which yarn weight the yarn belongs. Yarn weight refers to the yarn weight category system consisting of seven categories ranging from 0 to 6 and tells you how thick the yarn is.
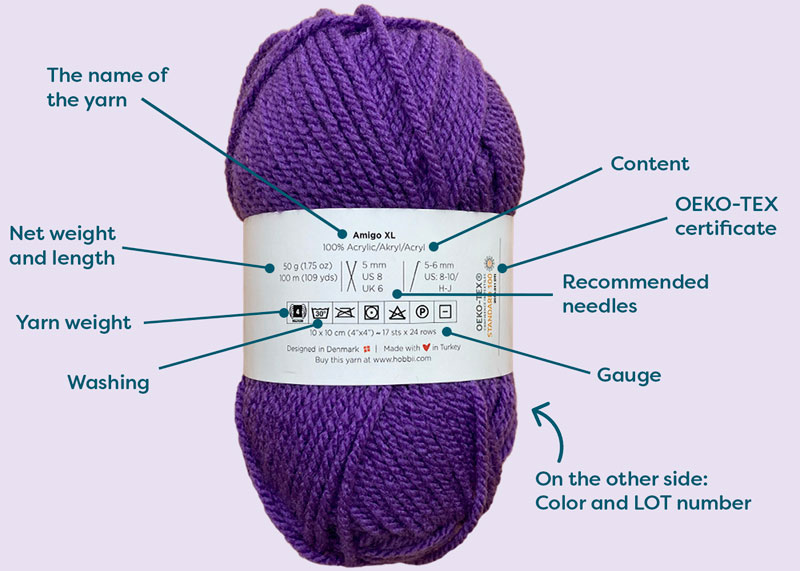
Here’s a photo of a label on our acrylic yarn, Amigo XL.
Well then, how do you choose the yarn for your first project?
If you’re eager to get started, it’s a good idea to find a pattern with a medium-thick to thick yarn where you’ll be able to see the results of your hard work very quickly. It could be yarns like our Amigo XL or Snowstorm.
Tip! It’s easier to knit in a bright color or a light-colored yarn since it makes it easier to see what you’re doing.
If you’re thinking about using a different yarn than the one used in the pattern, you can read our blog post about how to calculate alternative yarn amounts.
Choose the right knitting needles
You can get all kinds of different knitting needles. There are straight/single-pointed needles, circular needles, and double-pointed needles and they’re all great for different types of projects.
Circular needles are a great choice for your first project. Circular needles consist of a couple of short needles connected by a wire of a given length. With circular needles - as the name suggests - it’s easy to knit things in the round (for items like hats), but you can also use them to knit back and forth (for things like dishcloths).
Knitting needles also come in different materials including metal, plastic, wood, and bamboo. The choice of material partly comes down to preference but it also impacts your knitting. Very smooth yarns (like cotton and tencel) can be worked on wooden or plastic needles, while less smooth yarns (like acrylic) move more easily on metal knitting needles.
Make a swatch - and make sure that your knitting won’t be too small or too big
We all knit in different ways, and that’s why it’s a good idea to make a gauge swatch before you start your project.
Your swatch will tell you all you need to know about your knitting tension, and you will be able to see if your finished project will be true to size and will fit you. Think about how many hours you’re going to spend knitting … it would be a SHAME if you ended up with a sweater that was too small!
That’s why you should always make a swatch before you start a new project. The swatch will also give you important insight into the amount of yarn you need to buy to make sure that you have enough for the entire project.
What do I do if my tension is too tight or too loose?
When you’ve made your swatch, you measure your tension in a 10 x 10 cm (4”x4”) square. If you have fewer stitches than what the gauge calls for on the label or in the pattern, it means that your knitting is looser than it should be, while more stitches indicate that your knitting is too tight.
If your knitting is too loose, then you can go down a needle size to hit the desired gauge. On the other hand, if your knitting is too tight, you can go up a size. And you’re ready to go. Yay!
Learn to knit
Yaaaay! We’ve reached the fun part of our knitting journey. You’re going to learn how to knit!
There are four basic techniques when it comes to knitting:
- Casting on stitches.
- Knitting.
- Purling.
- Binding off.
You might be thinking: Is it really that simple? And yes, it actually is! Learn these four techniques, and you’ll be ready to start knitting your first projects.
Psst! If you’re already familiar with the basic knitting techniques, feel free to skip this part and scroll straight to the beginner-friendly patterns.
Please note that the different techniques can be done in different ways. Choose the method that works best for you.
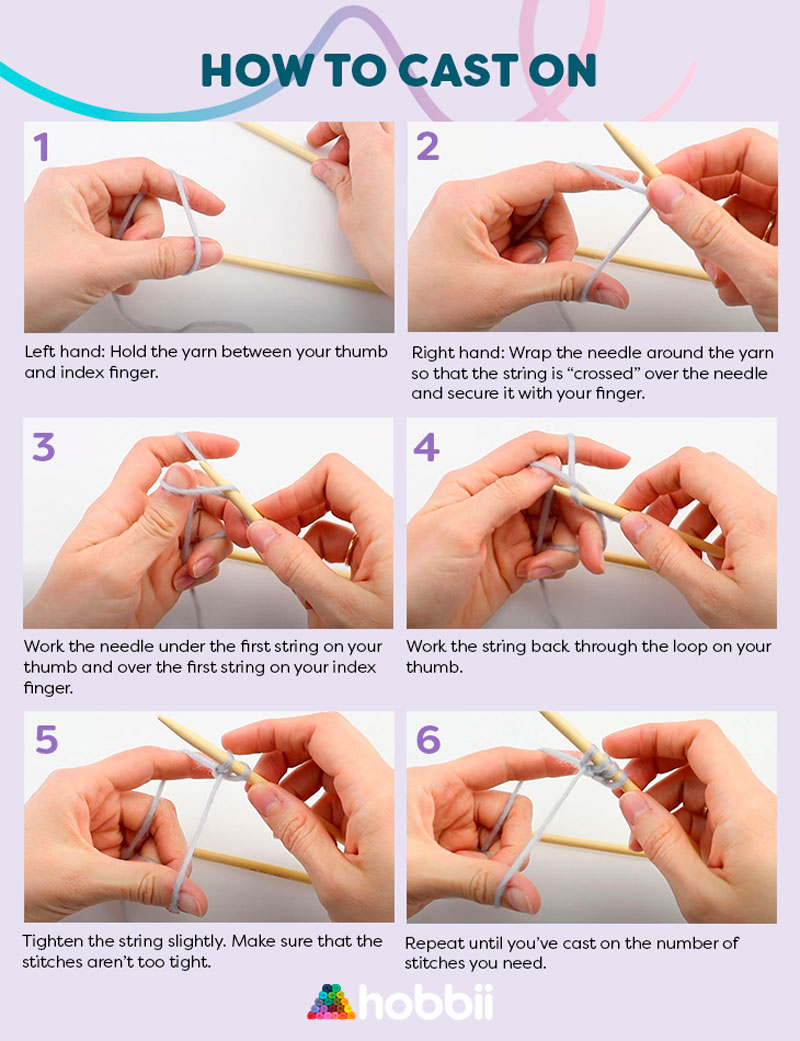
Let’s kick off our knitting journey by learning how to start a new project: otherwise known as “Casting on stitches”.
How to cast on
The video above will teach you how to cast on stitches.
Video tip! Did you know that you can put English subtitles on all of our YouTube videos? Just click “Settings” (the little gear under the video ⚙) and then choose “Subtitles”. You can now change the language. You can also adjust the speed if you need to slow it down and watch the technique in slow motion.
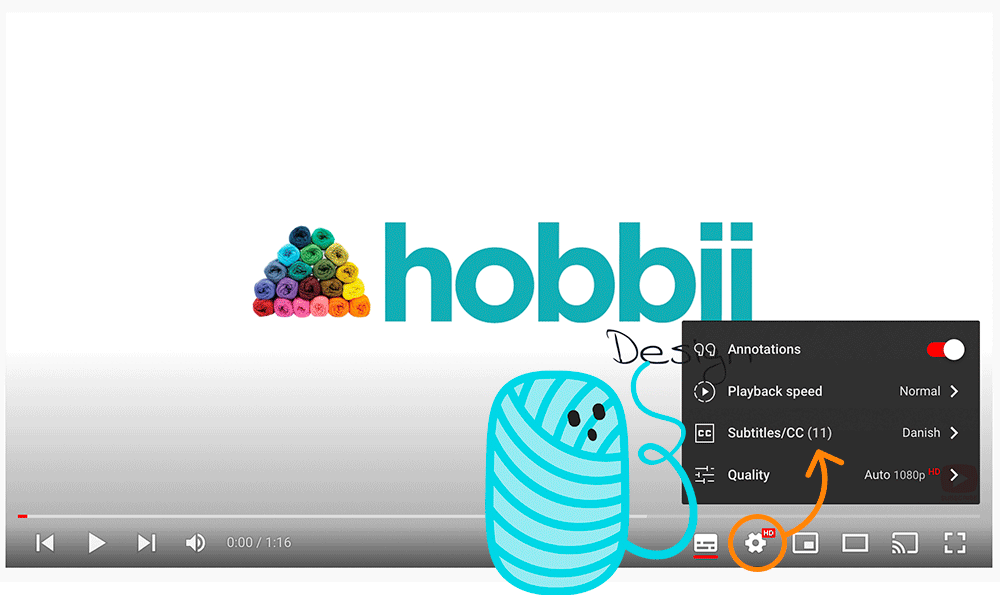
How to change the language of the subtitles.
Many people start their cast on with a loop. However, that creates a knot in your knitting that you can actually avoid if you use the technique shown in the video. Then you’ll get a rounder and softer edge.
Cast on
- Left hand: Hold the yarn between your thumb and index finger.
- Right hand: Wrap the needle around the yarn so that the string is “crossed” over the needle and secure it with your finger.
- Work the needle under the first string on your thumb and over the first string on your index finger.
- Work the string back through the loop on your thumb.
- Tighten the string slightly. Make sure that the stitches aren’t too tight.
- Repeat until you’ve cast on the number of stitches you need.
Make sure to cast on loosely
It will be easier for you to knit your first rows if you cast on loosely. You may have heard that you can cast on using two needles instead of one, but that actually makes your stitches longer and more sloppy-looking.
Instead, you can put your finger between the last stitch and the one you’re casting on. That way, you’ll get nicer-looking and loose edge stitches.
Tip! When you’re starting a large project with many stitches, it can be hard to keep track of how many stitches you’ve cast on. Use stitch markers to keep track of the number of stitches. For example, you can attach a new stitch marker each time you’ve cast on 20 stitches. The marker can be attached to your needle or your stitch, whichever you prefer.
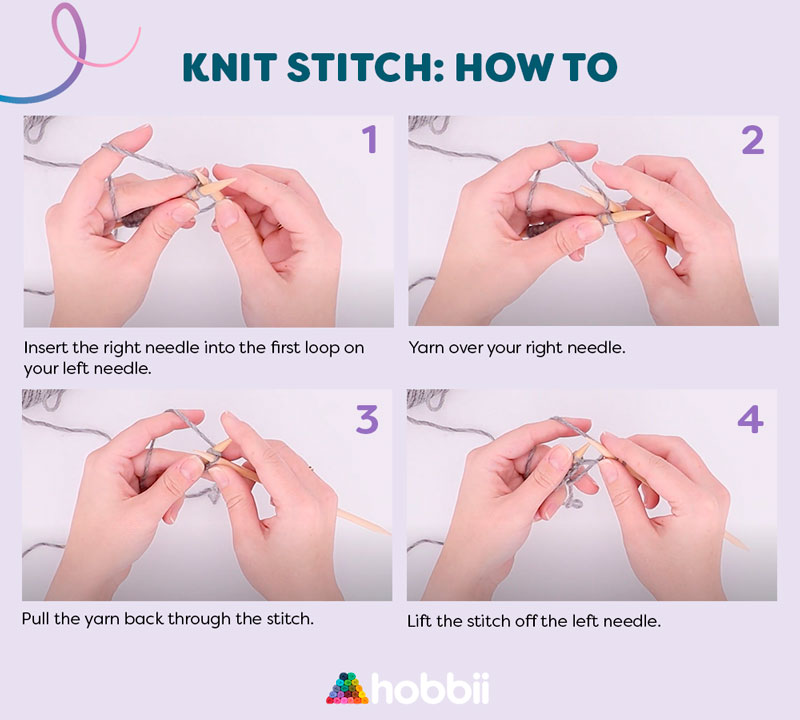
How to do a knit stitch (k)
The knit stitch, abbreviated with a k, is one of the most common knitting techniques. Learn how to do the knit stitch in the video above. Don’t give up if your stitches don’t slide easily on your needles right away. The more times you repeat the movement, the easier it will become. That’s why it’s a good idea to start your knitting journey with easy projects, where you can really commit the technique to memory. You could practice the knit stitch by making, say, a dishcloth.
Knit stitch: How to
- Insert the right needle into the first loop on your left needle.
- Yarn over your right needle.
- Pull the yarn back through the stitch.
- Lift the stitch off the left needle.
How to do the purl stitch (p)
The next basic knitting technique that you should get comfortable with is the purl stitch (p). Purl stitches may look harder to do than knit stitches at first glance, but as with everything else, it just takes practice. Watch how to do the purl stitch in the video above.
Purl stitches: How to
- Move your yarn to the front of your work.
- Insert the right needle into the first stitch on the left needle from the back.
- Catch the yarn with the tip of your right needle and pull it through the stitch.
- Let the stitch slide off the left needle.
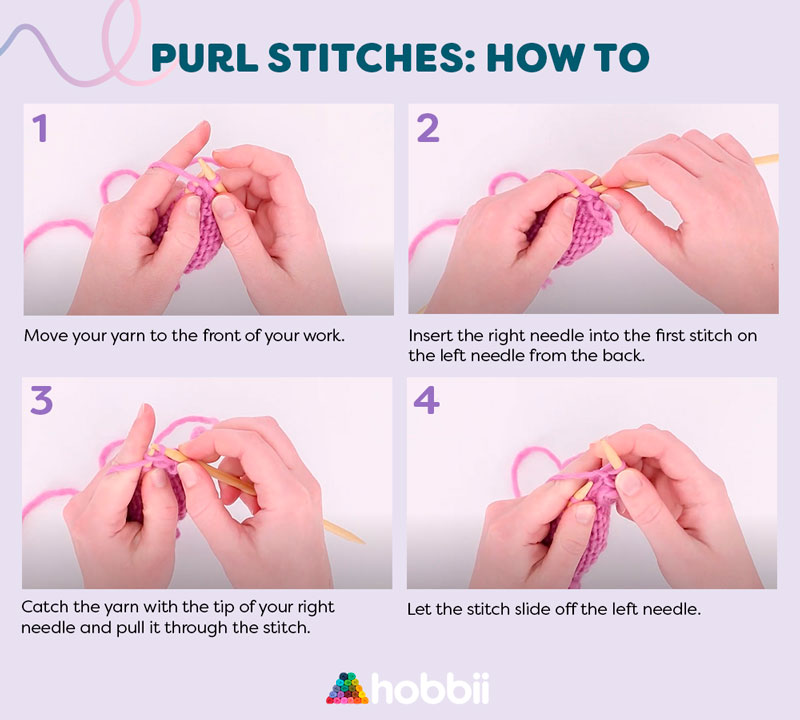
Is this not the way your grandmother taught you how to do the purl stitch? There are actually several different ways to do the purl stitch, and they all work equally well. It all comes down to what technique works best for you. I chose this one because I think this is the easiest one to learn when you’re new to knitting.
Fantastic! Now you can do the knit and the purl stitch. You can actually do several different knitting techniques now that all consist of different combinations of the knit and purl stitch. Among those are the stockinette stitch, rib stitch, moss stitch, and moss rib stitch.
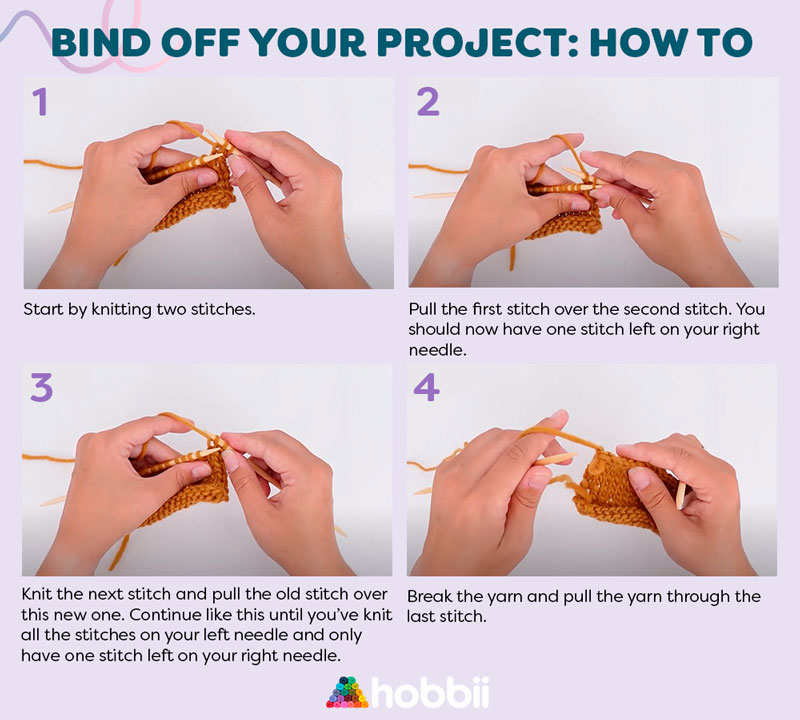
How to bind off your project
You’ve reached the last step in the knitting process. You need to bind off your project. Watch how to bind off stitches in the video above.
It’s very simple: You just knit two stitches and then use the left needle to lift the first knit stitch over the second one - and you just repeat that for the rest of the stitches. When you’ve reached the end, you just pull the yarn through the last stitch. As a finishing touch, you need to weave in your ends with a needle.
Bind off your project: How to
- Start by knitting two stitches.
- Pull the first stitch over the second stitch. You should now have one stitch left on your right needle.
- Knit the next stitch and pull the old stitch over this new one. Continue like this until you’ve knit all the stitches on your left needle and only have one stitch left on your right needle.
- Break the yarn and pull the yarn through the last stitch.
YAY! Now you know how to knit!
Congratulations! What a ride! Now you’re a true knitter.
You’ve learned the basic knitting techniques and it’s time to celebrate. How about starting your very first project?
Beginner-friendly patterns
You’re ready to get started on your very first knitting project.
It’s usually a good idea to start with smaller projects like dishcloths, a scrunchie, a hat, or a scarf. We have lots of beginner-friendly patterns that you can get started on.
Find our large selection of knitting patterns here.
Knit a dishcloth
A great way to practice your knitting techniques is by knitting some dishcloths. I’m speaking from experience here. It’s a great way to get familiar with the basic techniques at your own pace.
Use your imagination or follow a pattern. The important thing is to get started with your knitting and not be afraid of making mistakes.
Our cotton yarn, Rainbow Cotton 8/4, is great for dishcloths, and you can use the slightly thicker version of the same yarn, Rainbow Cotton 8/8, if you want to knit some potholders.
Knit a scrunchie
Another beginner-friendly project is a scrunchie. You can either knit a square piece with stockinette stitches or knit in the round on circular needles. When you’re done, you just sew or crochet the edges together around a hair tie - and, voila, now you have a really pretty hair accessory!
If you’d feel more comfortable following a pattern, you should try our pattern for the Party Scrunchie. But please note that Diablo, which is the yarn you’ll need for this pattern, is a thin yarn, so you should feel comfortable using thinner needles.
Knit a hat
How about knitting a hat or a headband? One of the very first knitting patterns I ever made was a hat. And let me tell you, I was so proud when I was done!
You can try your hand at the Forst Hat or the Ydun Hat. They’re both knit in our lovely and warm wool blend, Tweed Delight.
Did you make a mistake?
Making mistakes is a normal part of knitting. Even the experts and the most passionate knitting-enthusiasts will drop a stitch once in a while or make a mistake in their projects.
And it’s completely normal to want to throw your knitting out the window once in a while. So, take a deep breath and take a break 😊
If a bit of bad luck should come your way, there’s plenty of help out there! You can find all the help you need on Google or YouTube. On our Youtube channel, you can find even more techniques and lots of inspiration for your next project.
Become a member of our knitting and crochet community on Facebook!
Did you know that we have a large community full of creative and passionate yarn-lovers where you can find lots of inspiration and ask experts as well as other new knitters and crocheters for advice? The group is called Knit and crochet with Hobbii ❤

Finished a project? Show us! 🎉
Have you finished your first ever project - or have you already started your second, third, or fourth project?
We’d love to see the dishcloth, hat, or sweater that you’re probably (and rightfully so) very proud of.
Have you knit one of our patterns?
Share a photo of your project on our website ❤ Find the pattern you’ve knit and upload a photo under the tab “Photo gallery”. Remember to write a review of the pattern too.
Have fun and happy knitting!
All our love ❤️

Leave a comment