When working on a detailed design, it makes perfect sense to use duplicate stitches on top of your knitting. In this blog post, I will be your guide and help you get started on your exciting duplicate stitch journey.
Duplicate stitch is a technique where you embroider new stitches over stockinette stitch. This technique makes it look like the duplicate stitches are part of your knitting.
The stitches are embroidered onto your finished project and can be used to add pretty details. Perfect, if you want to add that extra final touch to your project!
Duplicate stitch is also a super simple and useful technique. Let’s take a look at how to do the duplicate stitch!
What you need
- A wool needle or a tapestry/darning needle.
- Yarn. You get the best results if you make your duplicate stitches in the same yarn as what you used to knit your project.
Video tutorial: How to duplicate stitch
Start by cutting a length of yarn in the appropriate length and thread it onto your needle. Now, find the part of your project that you want to sew your first duplicate stitches onto. You may have a pattern with a diagram that you can follow.
Now you’re ready to start!
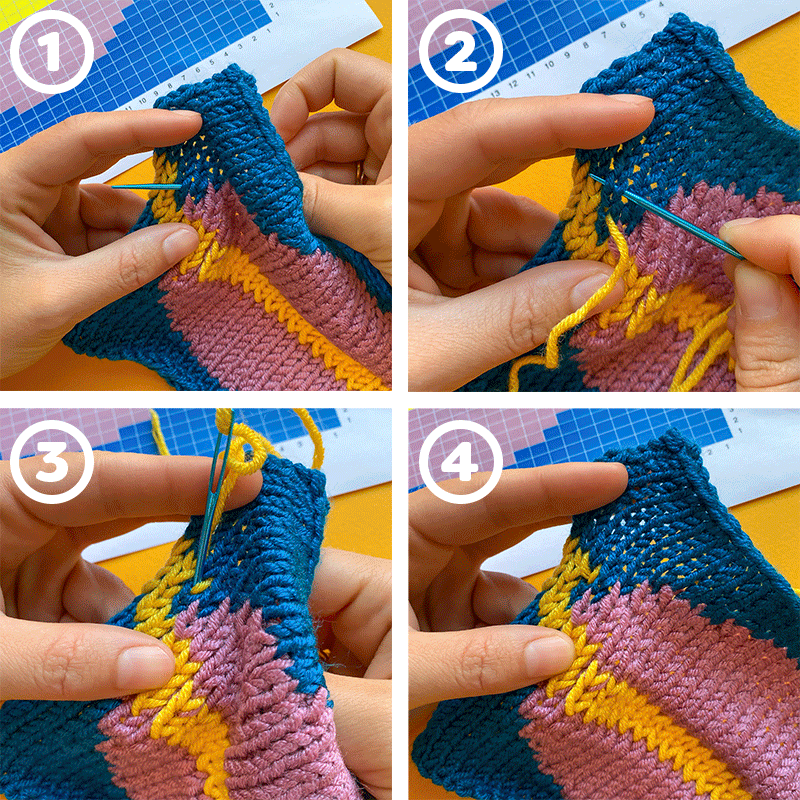
Step-by-step: Duplicate stitch
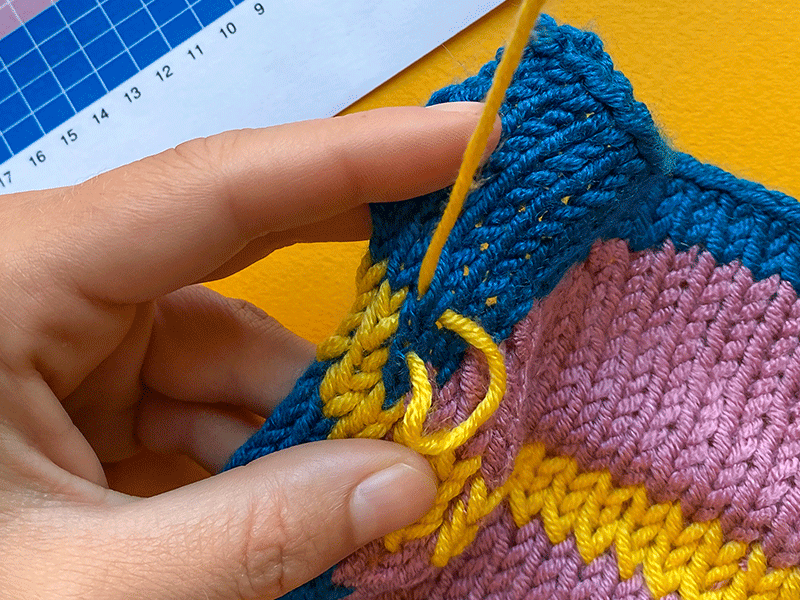
- Work your needle from the back of your work to the front through the bottom of the stitch (the point of the ‘V’).
- Next, work your needle through the ‘legs’ of the stitch above. Pull the yarn through.
- Once again, insert the needle into the bottom of the stitch at the point of the ‘V’, so that you end up at the back of your work again.
- Continue working like this until you’ve finished your motif.
Tip: Go straight to the start of your next stitch
If you want to avoid pulling the yarn through your work more times than is strictly necessary, you can work your needle through the left leg of the stitch you’re working on, and then through the right leg of the next stitch. That way, you will go straight to the starting point of your next stitch 😉
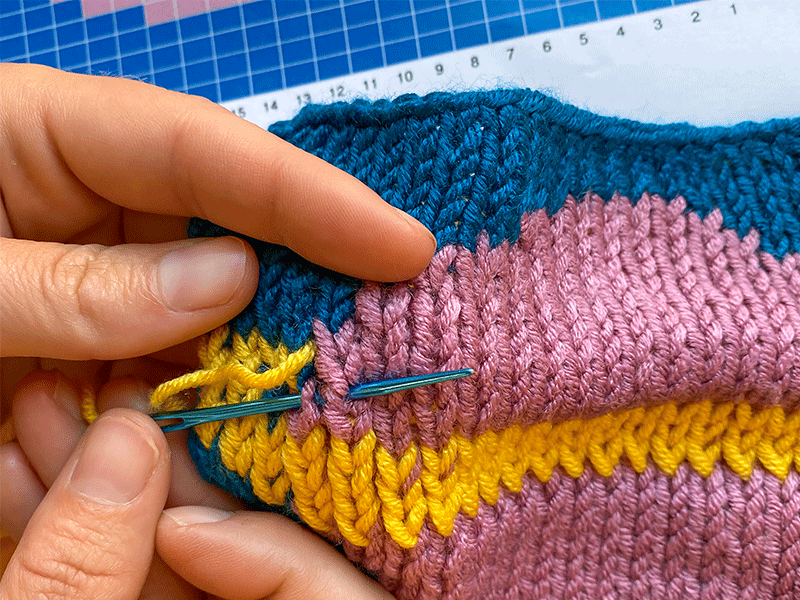
👆 Working duplicate stitches is a lot faster if you go straight to the starting point of the next stitch as shown above.
Duplicate stitches in ‘A’- or ‘V’-oriented stitches
There are two ways to make the duplicate stitch: Over ‘A’-oriented stitches or ‘V’-oriented stitches (that is, regardless of whether you’ve worked your project top-down or bottom-up). In the tutorial above, the example shows me working ‘V’-stitches on a swatch.
Regardless of whether you choose to embroider using ‘A’- or ‘V’-oriented stitches, the approach is the same: You start at the tip/point of your stitch and embroider a new stitch on top of the existing stitch by pulling the yarn through the ‘legs’ of the stitch above (with ‘V’-stitches) or below (with ‘A’-stitches).
Advice on working duplicate stitches
1. Supplement with other techniques if you’re working on a large motif
Remember! Your knitting will get thicker and stiffer when you add duplicate stitches on top of it. It’s worth remembering before you design and plan large and intricate motifs.
If you want to make a large and detailed motif, you may want to consider primarily using either the jacquard or intarsia technique and then supplement the design with some duplicate stitches. You can achieve especially beautiful results using the intarsia technique if you plan on switching between two or more colors to create a large motif.
Not familiar with intarsia? Learn how to knit intarsia here >>
2. Follow a chart
It’s a good idea to follow a chart when embroidering duplicate stitches on top of your knitting because then you know exactly what your final motif is going to look like.
You can also draw your own motif on some graph paper or use a special computer program.
Do you have a tip for others who want to try their hand at using the duplicate stitch? Write a comment in the box below and spread some good creative karma 👇
Happy yarn greetings 💜

Leave a comment