We are going to get started on the first part of the pattern. I will hold your hand through the process with video tutorials and thorough explanations. You can also get great tips and tricks for your future crochet projects - whether you are new to crocheting or already a pro.

It is so nice that you want to give the wonderful world of crochet a whirl with Hobbii’s Cozy Crochet School! I can’t wait to guide you gently through the pattern for our classic bread basket made with our very own ribbon yarn, Ribbon.
However, before we start crocheting the bread basket, I would like to give you some tips that I’m sure you are going to need later on in your crocheting career.
The Crocheted Gauge Swatch
When you start a new project, it’s always a good idea to start with a gauge swatch.
You make a gauge swatch to ensure that your crochet tension is correct, that your finished project will turn out as expected, and, more importantly, that you have enough yarn to finish your project.
It’s especially important to make a gauge swatch before you start crocheting clothes or other things that must be true to size, but not all projects call for a gauge swatch. For instance, this bread basket does not. However, you do need to make sure that the material is stiff enough to keep the basket from slouching.
If you feel like the stitches become too tight with a 5 mm crochet hook, you can go up one hook size to make the material slightly looser, but remember - it shouldn’t be too loose either. The basket looks best and is much more functional if the stitches are as tight as possible.
Remember to stretch
Ribbon is a ribbon yarn, which means that it can be very hard to work with physically. But as long as you remember to take breaks once in a while, everything will be fine - and you need to get yourself something to drink or pet your animal friends once in a while anyway, right? You can even stretch a little if you need to.
These four exercises are especially great for crocheters:
- Stretch one arm out in front of you and bend your wrist up. Place your other hand on the fingers and apply gentle pressure toward yourself.
- Stretch one of your arms out in front of you and bend your wrist down. Place the other hand on your fingers and apply gentle pressure toward yourself.
- Make a fist and rotate your wrist, first one way and then the other.
- Interlock your hands behind your back, lean forward, and lift your arms.
Some notes on holding your crochet hook
There are, generally, two ways you can hold a crochet hook - the knife grip and the pencil grip. Most of the time, it doesn’t matter which one of the techniques you prefer - it simply comes down to preference and the comfort of the individual crocheter.
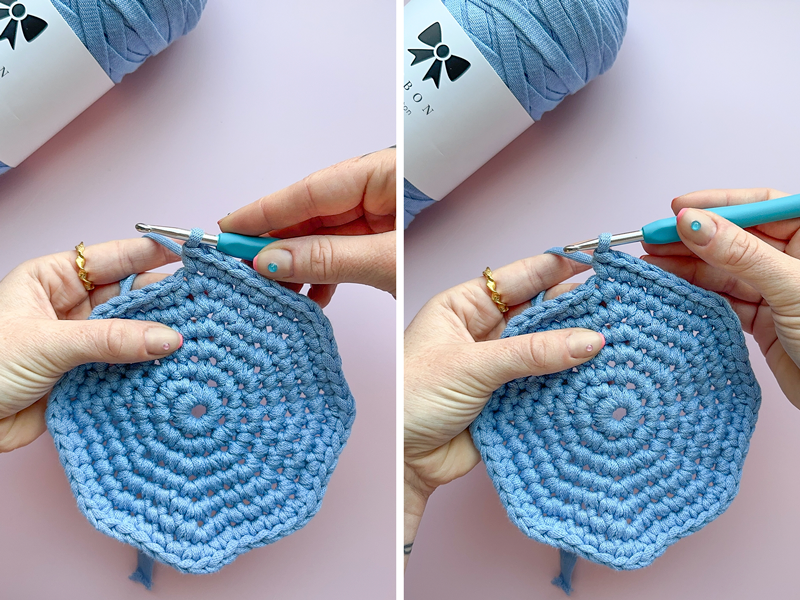
Here, you can see how to hold the crochet hook with the knife grip (on the left) and the pencil grip (on the right).
TIP! Working with Ribbon yarn is a special process. It’s a good idea to use your entire arm to crochet, not just your hand and wrist, and thus, it may be easier to use the knife grip than the pencil grip. It will help prevent fatigue, and you will need fewer breaks, which means more crochet time!
Let’s get started on the pattern
Let’s get that hook ready and get started on your bread basket! I will do my best to hold your hand and guide you through the pattern and hopefully leave you with a beautiful new bread basket that I am sure you are going to use for years to come. We will start with the bottom.
Let’s go!
In this part, you are going to use the following techniques
- Magic ring (abbreviated mr)
- Single crochet (abbreviated sc)
- Back loop only (abbreviated BLO)
The bottom
I will walk you through the pattern for the small basket, but the procedure is the exact same for the large one. The only difference is the number of rounds.
We will start by making a magic ring and crocheting Round 1 in the magic ring. Round 1 will be explained further down on this page.
Learn how to make a magic ring below:
Video tip! Click on “Settings” (the small gear under the video ⚙) to change the language of the subtexts. You can also adjust the speed of the video if you need to rewatch the technique at a slower pace.
Read more about the magic ring here.NB! In the video, 6 single crochets are worked in the magic ring. You should not do this. Instead, crochet the number of stitches that the pattern states are needed for round 1.
TIP: A magic ring can be tricky if you are new to crocheting, but as with many other things, practice makes perfect, so keep trying! You will be very happy to know how to do a magic ring at many other points in your crocheting career ;-)
Giving you too much trouble? You can also just chain 4 and make these into a ring with a slip stitch (press “slip stitch” to see how to do one of these). When you have done this, crochet the first row in the chain stitch ring instead of the magic ring.
Round 1 (crocheted in the magic ring)
Crochet 8 single crochets
How to single crochet:
You can learn much more about single crochets here.
TIP: Attach a stitch marker to your first stitch (the first single crochet you made in the magic ring) to make it easier for you to keep track of where you are in your round.
That’s it! You have now crocheted the first round of your bread basket. From now on, you must crochet in the stitches from the previous round, not the magic ring.
Round 2
- Crochet 2 single crochets in each stitch. This is called an increase. Watch the video below if you need a reference.
- You should now have 16 stitches in your round. Learn how to count stitches in the video further down on this page.
How to do a single crochet increase:
How to count stitches:
Round 3
- Crochet 1 single crochet in the next stitch.
- Crochet 2 single crochets in the next stitch.
Repeat these two steps for the rest of the round. You should now have 24 stitches in your round.
Round 4
- Crochet 1 single crochet in the next 2 stitches.
- Crochet 2 single crochets in the next stitch.
Repeat these two steps for the rest of the round. You should now have 32 stitches in your round.
Yay! You have now crocheted the first 4 rounds and are off to a great start with your very first bread basket. It is hard - but fun - work, but how about a little break? Go get something to quench your thirst, do some stretches, and remember to give yourself a pat on the back.
Round 5
- Crochet 1 single crochet in the next 3 stitches.
- Crochet 2 single crochets in the next stitch.
Repeat these two steps for the rest of the round. You should now have 40 stitches in your round.
Round 6
- Crochet 1 single crochet in the next 4 stitches.
- Crochet 2 single crochets in the next stitch.
Repeat these two steps for the rest of the round. You should now have 48 stitches in your round.
Round 7
- Crochet 1 single crochet in the next 5 stitches.
- Crochet 2 single crochets in the next stitch.
Repeat these two steps 7 times.
Crochet 1 single crochet in the last 6 stitches.
You should now have 55 stitches in your round.
It is important that you have an uneven number of stitches before you move on to crocheting the sides of the basket. It is important to the pattern you are crocheting.
You are now finished with the bottom of your bread basket, and I think you deserve a nice break. You are already halfway done with your pretty basket.
Can’t get enough and want to get started on the large bread basket right away? Just crochet round no. 7 as per usual. Then repeat the procedure from rows 2-4 until you reach round no. 10. On the 10th round, repeat the process described in row number 7 but with 8 stitches between the increases and finish off with 1 single crochet in the last 9 stitches.
