Craft Your Own Gift Box for Hobbii Gift Cards

Craft Your Own Gift Box for Hobbii Gift Cards

Ready to take your gift-giving to the next level? 🎁 A gift voucher for Hobbii is already an awesome present, but why not make it even more special? No one wants to hand over just a piece of paper or forward an email with a code – let’s add some extra charm!

We’ve created a super cute DIY template for a gift box that’s perfect for holding that gift voucher code. It’s quick, fun, and very easy to put together! Just print, fold, and voilà! You've got a gift box that’s as sweet as the real gift inside. 🧶

Click here to download the gift box template ➜

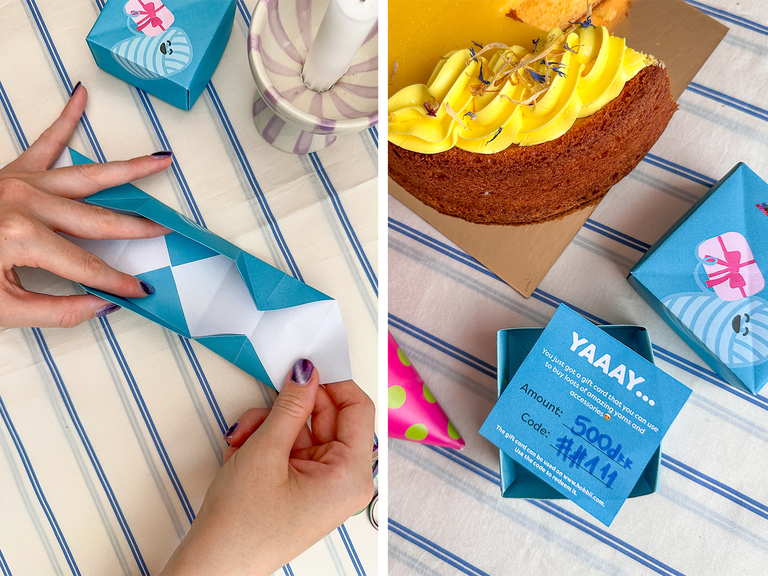
Don't forget to write the voucher amount and code inside before wrapping it up!

Need the gift voucher? Grab one here ➜

Step by Step: Here’s How to Fold the Box

Step 1: Cut out all the pieces

Grab your scissors and cut out the three parts:

  • The top of the box (a square)
  • The bottom of the box (another square)
  • The little insert where you’ll write the gift card amount and code
Hobbii Gift Box - Step 1

Step 2: Start folding the top

Let’s begin with the top part of the box. (The bottom folds the same way later!).

First, fold the square in half so the corners meet. Unfold it. Then fold it in half the other way. You should now have a little “X” crease in the middle — this will help guide you.

Hobbii Gift Box - Step 2

Step 3: Fold the corners in

Take each corner and fold it in so the tip touches the center of the square.

Hobbii Gift Box - Step 3

Step 4: Fold the edges in

Now fold each of the four edges toward the center, just like you did with the corners.

Hobbii Gift Box - Step 4

Step 5: Unfold a little

Unfold everything again, but leave two opposite corners folded in. Just those two.

Hobbii Gift Box - Step 5

Step 6: Fold the long edges again

Fold the two long sides back toward the center. You’re about to see the box take shape!

Hobbii Gift Box - Step 6

Step 7: Build one more side

Now lift up the two long sides so they stand up like little walls. Fold in one of the corners that’s still loose — this helps form one of  the short sides of your box.

Hobbii Gift Box - Step 7

Step 8: Finish the last side

Fold in the last corner the same way, and boom — your box top is done! 🎉

Repeat steps 2–8 to fold the bottom of the box. Fill out the gift card info on the little insert and pop it inside.

And there you have it: a sweet little box, handmade by you, ready to make someone’s day! 💌

Hobbii Gift Box - Step 8
Latest Blog Posts
#TheHerdCAL – All Your Questions Answered!

#TheHerdCAL – All Your Questions Answered!

Got questions? We've got all the answers right here. 

Saddle Up for #TheHerdCAL: Your Crochet Gauge Swatch Guide

Saddle Up for #TheHerdCAL: Your Crochet Gauge Swatch Guide

  Trot into the CAL with the perfect tension! 🐎

Meet the New Flock by Amour Fou Crochet

Meet the New Flock by Amour Fou Crochet

Spread your wings with 3 new amigurumi bird crochet patterns by Carla Mitrani.

24 Adorable Crochet & Knitting Patterns for a Cozy Easter

24 Adorable Crochet & Knitting Patterns for a Cozy Easter

Make this spring extra special with 24 cute crochet and knitting patterns for Easter. From fluffy bunnies to festive decor, start crafting today!

Meet the Designer: Khuc Cay

Meet the Designer: Khuc Cay

Get ready for spring with Khuc Cay! 🌷 Meet the designer behind our new Easter collection 🧶

5 new Scandi-Inspired Sweaters by Rūkėknit

5 new Scandi-Inspired Sweaters by Rūkėknit

Spring is calling! Discover 5 new free Scandi-style knitting patterns designed by Neringa Rūkė for Copenhagen Fibers.

Meet the Designer: Anna Husemann

Meet the Designer: Anna Husemann

Abstract shapes meet industrial vibes. 🎨⚓️

Meet the Designer: Klara Nilsson

Meet the Designer: Klara Nilsson

Pink, red, and Valentine yarn spins! 💖🧶

10 Secret Questions with Toni Lipsey: Uncovering the Magic Behind the #FrostandBloomCAL

10 Secret Questions with Toni Lipsey: Uncovering the Magic Behind the #FrostandBloomCAL

Exclusive interview: Inspiration, top tips, and the story behind the Aura Lapghan.

Crochet along with Toni from TL Yarn Crafts for the #FrostandBloomCAL

#FrostandBloomCAL – All Your Questions Answered!

Got questions? We've got all the answers right here!

Ready, Set, Crochet! Practice Your #FrostandBloomCAL Stitches!

Ready, Set, Crochet! Practice Your #FrostandBloomCAL Stitches!

  Can't wait to begin? Master these 3 essential stitches for the CAL.

Two crochet hexagon motifs for the #FrostandBloomCAL by Toni Lipsey, displaying the solid beige gauge swatch and a purple hexagon.

How to Make the Gauge Swatch for #FrostandBloomCAL

The first step to the perfect blanket.